A distro agnostic guide to Graphite with venv
How to install and configure the Graphite TSDB on RHEL8, Debian 10, Ubuntu 18.04 and Ubuntu 20.04.
I originally posted this to the Icinga forums in 2019 and have since updated it for this blog. Because of this, the latter portion of the guide is targeted at getting Graphite working with Icinga. The original post is here.
With a lot of outdated documents on how to get Graphite working properly, I figured it would be good to provide something up to date and relevant for the latest batch of enterprise Linux operating systems, but also using virtual environments to make it usable on anything with recent versions of Python.
This article is targeted at the new standardization of python3.6+, and we're using py-venv to avoid any distribution specific caveats that might keep the latest version from running. This has been tested on RHEL8, Debian 10, and Ubuntu 20.04.
For this demonstration, we will be using the following:
- Whisper backend
- 1 Carbon relay
- 2 Carbon cache daemons
- Graphite-web
- Gunicorn
- Nginx
- Icinga2
If you're completely new to Graphite, it's like this: Carbon is the actual time series database, Graphite is a web portal that sits in front of it. Whisper is a storage file format in which Carbon houses metrics. There are other options for a Carbon backend, but this is the one that's part of the project.
I'm choosing to do this with a carbon-relay to get your feet slightly damp with Carbon clustering. A carbon-relay just routes incoming data to various cache daemons which handle the actual work. You can add as many carbon-cache daemons as you like, and it's not unusual to use one per server core on dedicated Graphite servers. You may wish to explore more advanced setups with aggregation in the future if you find yourself housing 32TB of graph data.
Getting distro dependencies
Although the instructions here will be applicable to anything with systemd and python3.6+ going forward, you'll need to have the necessary things for the toolset to build. If you're on something esoteric, I assume you can handle this step.
RHEL8
Example from minimum install:
# dnf install python36 python36-devel gcc gcc-c++ make libffi-devel
Debian 10 and Ubuntu 18.04/20.04
Debian provides Python 3.7. Ubuntu 18.04 provides 3.6 and 20.04 provides 3.8. All are fine for this demonstration.
# apt update
# apt install python3 python3-dev python3-pip python3-venv gcc g++ make libffi-dev libcairo2-dev
Installing Graphite
Let's install our virtual environment.
# cd /opt
# python3 -m venv graphite
And an unprivileged user to run this.
# useradd -d /opt/graphite -s /bin/bash -M -r carbon
# chown -R carbon:carbon /opt/graphite
Now let's get into our environment. Using activate as your bash source will set up the necessary environment variables for your contained instance of python.
# su - carbon
$ source bin/activate
We're going to use pip to install everything. Graphite/Carbon have some set expectations on where everything should be installed, so we'll be specifying that explicitly.
(graphite) $ pip install --upgrade pip wheel setuptools gunicorn whisper
(graphite) $ pip install carbon --install-option="--prefix=/opt/graphite" --install-option="--install-lib=/opt/graphite/lib"
(graphite) $ pip install graphite-web --install-option="--prefix=/opt/graphite" --install-option="--install-lib=/opt/graphite/webapp"
Configuring Carbon
carbon.conf
$ cd /opt/graphite/conf
$ cp carbon.conf.example carbon.conf
$ yourfaveditor carbon.conf
It's good to read through this entire config file. You'll learn a lot about how Carbon works. We need to cover a few pitfalls though that relate to a clustered setup.
Let's make sure we're using the carbon user here:
USER = carbon
We are going to REMOVE the following lines. This is because these are aimed at a single carbon-cache daemon running and not multiple. This will be repurposed elsewhere.
LINE_RECEIVER_PORT = 2003
PICKLE_RECEIVER_PORT = 2004
UDP_RECEIVER_PORT = 2003
CACHE_QUERY_PORT = 7002
Safety first! Change this to true.
WHISPER_LOCK_WRITES = True
There is a URL here for Graphite so that it and Carbon can make friends. Later on when we prepare the local_settings.py for Django, you might add a URI to the end. In this example, I have used /graphite for my server, and the default Gunicorn port of 8000 is mentioned.
GRAPHITE_URL = http://127.0.0.1:8000/graphite
Okay, so there's our default carbon-cache config. Next is to create specific configs for each carbon-cache daemon. Try this:
[cache:a]
LINE_RECEIVER_PORT = 2003
PICKLE_RECEIVER_PORT = 2004
CACHE_QUERY_PORT = 7002

[cache:b]
LINE_RECEIVER_PORT = 2103
PICKLE_RECEIVER_PORT = 2104
CACHE_QUERY_PORT = 7102
This is why we removed those lines earlier.
Now it's time to configure our relay. You may have noted the LINE and PICKLE protocols mentioned earlier. These are two ways to ship data to Carbon. Icinga uses LINE, which is plain text and less efficient. In this case, our relay is going to receive on LINE, but route to the cache daemons using PICKLE.
The "consistent-hashing" value below tells Carbon to equally distribute responsibility across the cache daemons. This is for a simple Graphite setup where we just have one database and need more resources for writing to it. For sharded or redundant Graphite servers across multiple nodes, there is plenty of that in Graphite's official documentation, and if you're reading this, you are so not ready.
Let's setup our relay section at the end like this. You can adjust to your liking as you learn more about Carbon.
[relay]
LINE_RECEIVER_INTERFACE = 0.0.0.0 # you can use 127.0.0.1 if Icinga is on the same server
LINE_RECEIVER_PORT = 2013
RELAY_METHOD = consistent-hashing
REPLICATION_FACTOR = 1
DYNAMIC_ROUTER = True
DESTINATIONS = 127.0.0.1:2004:a,127.0.0.1:2104:b
DESTINATION_PROTOCOL = pickle
DESTINATION_TRANSPORT = none
USER = carbon
QUEUE_LOW_WATERMARK_PCT = 0.8
TIME_TO_DEFER_SENDING = 0.0001
If you suddenly have carbon-relay hitting 100% CPU:
If the amount of data you're shipping to Graphite is considerably large, you might hit resource contention and the carbon-relay will start struggling with what to do with the data it needs to route to the cache daemons. If so, increase these values. Their default settings are actually pretty low, but on systems with plenty of memory and SSDs, you can crank these up.
MAX_QUEUE_SIZE = 100000
MAX_DATAPOINTS_PER_MESSAGE = 5000
Anyway, onto our schemas.
storage-schemas.conf
PAY ATTENTION FOR A MINUTE
Something that you'll find a million forum hits for if you google it is "I'm only seeing x days of graph data!" When setting up the following config file, FIRST MATCH HITS. I made this mistake when I was new, too. Don't feel bad.
It's time to setup our storage aggregation for Icinga. Copy the following example file to get started.
$ cp storage-schemas.conf.example storage-schemas.conf
$ emacs storage-schemas.conf
Let's add our regex patterns for Icinga time series. The format for retentions should be relatively obvious.
[icinga-hosts]
pattern = ^icinga2\..*\.host\.
retentions = 5m:4w

[icinga-services]
pattern = ^icinga2\..*\.services\.
retentions = 5m:12w,15m:26w,30m:1y

[carbon]
pattern = ^carbon\.
retentions = 60:90d

[default]
pattern = .*
retentions = 60s:1d,5m:30d,1h:3y
So here I've said all host checks (typically just pings) should house 5 minute time intervals for 4 weeks. Services should hold 5 minute intervals for up to 12 weeks, 15 minutes for up to 26 weeks, and 30 minutes for up to a year. If you have a very large infrastructure, expect a terabyte to disappear as soon as you turn this on. If you left WHISPER_FALLOCATE_CREATE set to true, it's going to claim all the space it needs within the hour.
storage-aggregation.conf
This config file is to specify how we want it to shove our data backward. Here's an example from mine:
[default_average]
pattern = .*
xFilesFactor = 0
aggregationMethod = average
Let's break this down, bottom to top:
aggregationMethod can be average, sum, min, max, or last. In my case, I have it averaging out the data points as they move from 5m to 15m.
xFilesFactor describes what to do with null values. This is a floating point number from 0 to 1. The default is 0.5, so if one time period has less than 50% of the time points defined, that becomes null as it moves backward. This often isn't ideal. In my case, I have a lot of 1m intervals set for checks that only run every 5 minutes. I like this because when it starts doing the retries in soft state, I get a more detailed view of what's going wrong. If I used 0.8, my graph would just disappear the second it aggregates. By setting it to 0, I'm saying that I don't care how few of the time points are used, if there are any, do something with it. 0.1 is another good option.
pattern is a regex just like in storage-schemas.conf. If you have some checks you'd rather take a different approach to xFilesFactor or aggregationMethod for, go ahead and create more blocks above this one.
Configuring Graphite
Graphite is a Django app. As such, there are standard ways of configuring your database and authentication methods. For the sake of the tutorial, we are going to blindly accept the defaults, and I'll defer you to resources for moving out of staging after you have a working setup.
Copy the example file and begin editing.
$ cd /opt/graphite/webapp/graphite
$ cp local_settings.py.example local_settings.py
Let's dig into our Django config. We'll cover a few settings worth overriding the defaults at this stage.
Make up some garbage for your secret key for hashing. The longer the better.
SECRET_KEY = 'imalittleteapotshortandstout'
In our example carbon.conf earlier, we specified this URI. This will be addressed in our nginx.conf as well. We're leaving off that trailing / though.
URL_PREFIX = '/graphite'
This by default isn't expecting multiple cache daemons. add as many as you created.
CARBONLINK_HOSTS = ["127.0.0.1:7002:a", "127.0.0.1:7102:b"]
CARBONLINK_TIMEOUT = 1.0
CARBONLINK_RETRY_DELAY = 15 # Seconds to blacklist a failed remote server
# The replication factor to use with consistent hashing.
# This should usually match the value configured in Carbon.
REPLICATION_FACTOR = 1
This should be enough to get you started here. Definitely adjust to your needs once Graphite is working. Let's get our config for gunicorn ready.
(graphite) $ cp /opt/graphite/conf/graphite.wsgi.example /opt/graphite/webapp/graphite.wsgi
You shouldn't even need to mess with this. Let's move on with our lives. One last step is to run Django's database migration feature.
(graphite) $ PYTHONPATH=/opt/graphite/webapp django-admin.py migrate --settings=graphite.settings --run-syncdb
If you have selinux enabled, you'll need to do this as root for later:
# setsebool -P httpd_can_network_connect 1
Systemd configuration
If you're one of the last hold outs on systemd, I'm going to assume your skills at writing init scripts are wicked good and you don't need my help.
From your virtualenv, type env on the command line to get details about the environment. We'll use this in our units.
Enter /etc/systemd/system as root and let's create these files.
carbon-cache@.service
[Unit]
Description=carbon-cache instance %i (graphite)

[Service]
Environment=PATH=/opt/graphite/bin:/usr/local/bin:/usr/bin:/usr/local/sbin:/usr/sbin
Environment=VIRTUAL_ENV=/opt/graphite
User=carbon
Group=carbon
ExecStartPre=/bin/rm -f /opt/graphite/storage/carbon-cache-%i.pid
ExecStart=/opt/graphite/bin/carbon-cache.py --instance=%i start --pidfile=/opt/graphite/storage/carbon-cache-%i.pid
Type=forking
PIDFile=/opt/graphite/storage/carbon-cache-%i.pid
LimitNOFILE=128000

[Install]
WantedBy=multi-user.target
If you're new to systemd units, the @ method is for passing an instance id to a service so that you do not need redundant init options in cases such as this.
carbon-relay.service
[Unit]
Description=Graphite Carbon Relay
After=network.target

[Service]
Environment=PATH=/opt/graphite/bin:/usr/local/bin:/usr/bin:/usr/local/sbin:/usr/sbin
Environment=VIRTUAL_ENV=/opt/graphite
Type=forking
StandardOutput=syslog
StandardError=syslog
ExecStart=/opt/graphite/bin/carbon-relay.py --config=/opt/graphite/conf/carbon.conf --pidfile=/opt/graphite/storage/carbon-relay.pid start
ExecReload=/bin/kill -USR1 $MAINPID
PIDFile=/opt/graphite/storage/carbon-relay.pid
Restart=always

[Install]
WantedBy=multi-user.target
graphite.service
[Unit]
Description = Graphite

[Service]
Environment=PATH=/opt/graphite/bin:/usr/local/bin:/usr/bin:/usr/local/sbin:/usr/sbin
Environment=PYTHONPATH=/opt/graphite/webapp:/opt/graphite
Environment=VIRTUAL_ENV=/opt/graphite
User = carbon
Group = carbon
WorkingDirectory = /opt/graphite/webapp
PIDFile = /opt/graphite/storage/graphite.pid
ExecStart = /opt/graphite/bin/gunicorn --bind 0.0.0.0:8000 graphite.wsgi
ExecReload = /bin/kill -s HUP $MAINPID
ExecStop = /bin/kill -s TERM $MAINPID

[Install]
WantedBy = multi-user.target
Okay, we're good to start enabling things.
# systemctl daemon-reload
# systemctl enable carbon-cache@a carbon-cache@b carbon-relay graphite
# systemctl start carbon-cache@a carbon-cache@b carbon-relay graphite
If you made more than 2 carbon cache daemons, include them as well.
Configuring Icinga
If you're reading this document for another platform, skip to their manual at this point. Carbon is likely already making metrics for itself, but we want to feed it something useful.
We're not going to be pointing Icinga at Graphite, but rather at Carbon. That line connection we made on the carbon-relay is going to disburse this to the daemons.
Let's get things ready to go. On the server running Icinga:
# icinga2 feature enable graphite
# emacs /etc/icinga2/features-enabled/graphite.conf
We're going to add an entry like so. Replace the address either with your graphite server or with 127.0.0.1 if Icinga is running on the same server.
object GraphiteWriter "graphite-demo" {
  host = "192.168.122.184"
  port = 2013
}
Make sure to use the line port from your carbon relay, not a pickle port and not one of the cache daemons. Icinga feeds over line, but the relay will use pickle to communicate to the cache daemons.
# icinga2 daemon -C
# systemctl reload icinga2
Now let's verify that our whisper files are generating correctly. Navigate into /opt/graphite/storage/whisper/icinga2 and drill down until you find a .wsp file for a given metric. We can use the whisper-info.py script to view the file's metadata.
# /opt/graphite/bin/whisper-info.py ./value.wsp

aggregationMethod: average
maxRetention: 31536000
xFilesFactor: 0.0
fileSize: 710260

Archive 0
offset: 52
secondsPerPoint: 300
points: 24192
retention: 7257600
size: 290304

Archive 1
offset: 290356
secondsPerPoint: 900
points: 17472
retention: 15724800
size: 209664

Archive 2
offset: 500020
secondsPerPoint: 1800
points: 17520
retention: 31536000
size: 210240
Here we have retentions of 5, 15, and 30 minutes, just like in my storage-schemas.conf, as well as an xFilesFactor of 0, like the storage-aggregation.conf shown earlier. These files have created correctly.
If you ever find yourself needing to change these values, simply changing the config and reloading carbon will not solve the problem. See whisper-resize.py for more information.If it seems like some metrics are not populating, check to see if carbon-relay is using 100% cpu and return to that section of the tutorial.
Configuring Icingaweb
You don't actually need nginx even setup at this point. Icinga will get what it needs directly from Gunicorn.
# cd /usr/share/icingaweb2/modules
# git clone https://github.com/Icinga/icingaweb2-module-graphite.git
# mv icingaweb2-module-graphite graphite
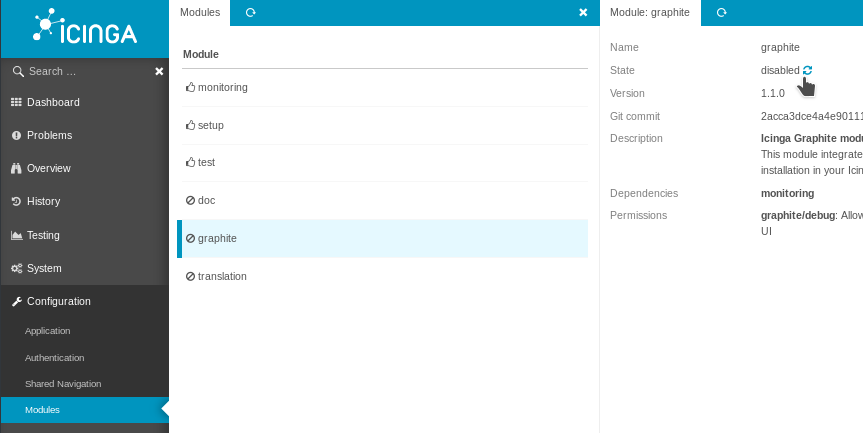
In icingaweb2, navigate to configuration > modules > graphite and click the reload icon to enable.
Enter the URL and the credentials if necessary (we didn't go over auth methods in this guide). In this case, we're pointing it directly to the IP address and port 8000, which is what Gunicorn is serving on.

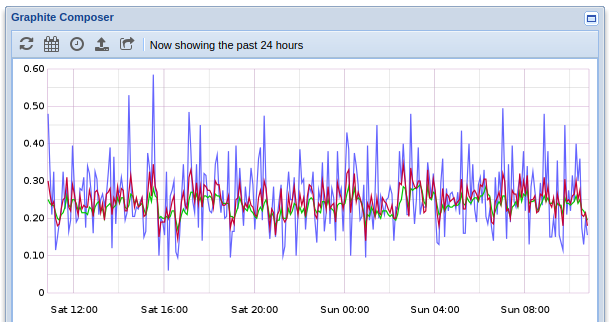
You should now see graphs in Icinga, like this one showing what happens when I run portupgrade on my webserver:

Nginx configuration
Well, you probably want to actually be able to use Graphite in its original intended capacity. Or not. Some people install the API-only version and use Grafana. You should look into Grafana, it's pretty awesome.
RHEL8:
# dnf install nginx
Ubuntu/Debian:
# apt install nginx
You're going to want to add the following to any server {} block that is relevant. This isn't meant to be a tutorial on nginx, so if it thus far isn't something you're using, just shove this in the default server block in /etc/nginx/nginx.conf
        location /graphite/ {
           proxy_pass http://127.0.0.1:8000/graphite/;
           allow 10.5.0.0/16; # example
           deny all; # example
        }

        location /graphite/static/ {
          alias /opt/graphite/webapp/content/;
        }
A few things to adjust accordingly, set "proxy_pass" to the gunicorn url, and make sure to have the trailing / as this is how Django "views" are standardized. The allow/deny settings I provided are an example and not required. In this example, I'm saying allow this particular IP subnet at my company, and deny everyone else.
Now go to http://yourdomain/graphite/ and make sure you can view all elements.
Moving out of your test environment
So we really didn't bother to secure anything here. I didn't even give you advice on how to manage your firewall (because I don't know if and what one you're using). Depending on what in your network is exposed where, you may have some holes to close before you start running Graphite in production. Here are your jumping off points:
Authentication
These settings are Django specific and defined in local_settings.py. Graphite's own documentation doesn't have much to say. Check here:
Settings | Django documentation | Django
Database backend
Same goes for using a database other than sqlite.
Databases | Django documentation | Django
Encryption between Carbon and Icinga
Note the following from the example config:
# This defines the wire transport, either none or ssl.
# If SSL is used any TCP connection will be upgraded to TLS1.  The system's
# trust authority will be used unless DESTINATION_SSL_CA is specified in
# which case an alternative certificate authority chain will be used for
# verifying the remote certificate.
# To use SSL you'll need the cryptography, service_identity, and twisted >= 14
# DESTINATION_TRANSPORT = none
# DESTINATION_SSL_CA=/path/to/private-ca.crt
Using SSL certificates with Gunicorn
Just add these flags to your gunicorn command:--certfile /path/to/cert.pem --keyfile /path/to/keyfile.key
Using SSL certificates with Nginx
From Nginx documentation: Configuring HTTPS servers