Secrets Storage With Vault On Your Home Server
You may be looking for a self-hosted solution for storing passwords and other secrets that you may not feel comfortable having in the cloud. Vault by HashiCorp is an enterprise secrets storage solution with both web based and command line access. It's open source and you can run it for free at home.
I do not recommend exposing this to the clearnet. My Vault server requires I hop onto my home network's VPN. I don't doubt Vault's security, but leaving it out in the open is opening you up to the same worries that come with using a commercial password manager or your browser's built in sync functionality. The goal here is to stash all this away.
For this guide, I'm using Debian, but I'll try to keep this as distro agnostic as possible.
Download and Install
Let's start by creating a system user account for Vault.
# useradd -r vault
Go to https://www.vaultproject.io/downloads and find the link to your architecture, then download and extract the vault binary to /usr/local/bin. Example as of the time of writing:
# wget https://releases.hashicorp.com/vault/1.6.3/vault_1.6.3_linux_amd64.zip
# unzip vault_1.6.3_linux_amd64.zip
# mv vault /usr/local/bin
# mkdir /etc/vault
# chown vault:vault /etc/vault
Configure a Storage Backend
There are many options for this. Consult the documentation and follow the instructions for your preferred method. Chances are if you're running a homeserver, you already have Postgres, MySQL or MariaDB running for other apps. We can keep life simple and just use that. For my example, I'm using Postgres on Debian.
# apt install postgresql-all
# su -c psql postgres
In the Postgres shell, we'll create a user, password, and database for Vault.
postgres=# CREATE DATABASE vault;
CREATE DATABASE
postgres=# CREATE ROLE vault WITH LOGIN PASSWORD '3Mq685AS2Zjzt2zZ2hTQ0zI4ZjmHoJoP';
CREATE ROLE
postgres=# GRANT ALL ON DATABASE vault TO vault;
GRANT
postgres=# EXIT
Now login as the vault user.
# psql -U vault -d vault -h localhost
Password for user vault:
psql (13.2 (Debian 13.2-1))
SSL connection (protocol: TLSv1.3, cipher: TLS_AES_256_GCM_SHA384, bits: 256, compression: off)
Type "help" for help.

vault=>
This SQL code will create the necessary schema. Note that this is copied verbatim from HashiCorp's documentation.
CREATE TABLE vault_kv_store (
  parent_path TEXT COLLATE "C" NOT NULL,
  path        TEXT COLLATE "C",
  key         TEXT COLLATE "C",
  value       BYTEA,
  CONSTRAINT pkey PRIMARY KEY (path, key)
);

CREATE INDEX parent_path_idx ON vault_kv_store (parent_path);
Configure the Service
Okay, now we want to create a config file for Vault.
# touch /etc/vault/config.hcl
# chown vault:vault /etc/vault/config.hcl
# chmod 600 /etc/vault/config.hcl
Edit and add the following.
storage "postgresql" {
  connection_url = "postgres://vault:3Mq685AS2Zjzt2zZ2hTQ0zI4ZjmHoJoP@localhost:5432/vault?sslmode=disable"
}

listener "tcp" {
  address     = "127.0.0.1:8200"
  tls_disable = 1
}

api_addr = "http://127.0.0.1:8200"
ui = true
disable_mlock = true
A few things to note here, the listener address being set to local means we'll need a reverse proxy to this to be able to access it from the outside. Setting ui to true means we'll have a web portal we can access it from. We'll be limiting access to that later. disable_mlock is required in order to run Vault as a non-root user. If you have unencrypted swap space, this is insecure and you'll need to run Vault as root.
Create the necessary systemd config in /etc/systemd/system/vault.service
[Unit]
Description=Vault
After=network.target postgresql.service
Requires=network.target

[Service]
User=vault
Group=vault
ExecStart=/usr/local/bin/vault server -config=/etc/vault/config.hcl
StandardOutput=syslog
StandardError=syslog
SyslogIdentifier=vault
Create directory /var/log/vault and set Vault as the owner. Create /etc/rsyslog.d/vault.conf and add the following:
if $programname == 'vault' then /var/log/vault/vault.log
& stop
And finally, create /etc/logrotate.d/vault.conf to complete our service setup.
/var/log/vault/vault.log {
    rotate 4
    weekly
    missingok
}
Now get everything started.
# systemctl restart rsyslog
# systemctl start vault
Initial Setup
Now we need to initialize Vault. You can do the following as an unprivileged user, but first let's unset the history file so sensitive data isn't stored there.
blake@vault-test:~$ unset HISTFILE
blake@vault-test:~$ export VAULT_ADDR="http://127.0.0.1:8200"
blake@vault-test:~$ vault operator init
Unseal Key 1: HemGy27C/An1PD/Rvmh+Scwv/h4rofatbBbEece/RKBG
Unseal Key 2: 0lZeThunWO1C/7hjrztIP6ayLfnLzeANZvgtRwM/u4Gs
Unseal Key 3: RqL+cLBcyLrBp2uC0+rOMb7umFEE4baHmta6VjdBVAIF
Unseal Key 4: tsadSAQzM7Lz6Ru5o7SyXeFwr1OblNca0G4NB5a1PqjT
Unseal Key 5: Ynss3Uocie6RJnVSkuIN+mB1FOzx0VOEKC45jhMUWoKB

Initial Root Token: s.aIajFemqnJ3f06vzGIjMi75P

Vault initialized with 5 key shares and a key threshold of 3. Please securely
distribute the key shares printed above. When the Vault is re-sealed,
restarted, or stopped, you must supply at least 3 of these keys to unseal it
before it can start servicing requests.

Vault does not store the generated master key. Without at least 3 key to
reconstruct the master key, Vault will remain permanently sealed!

It is possible to generate new unseal keys, provided you have a quorum of
existing unseal keys shares. See "vault operator rekey" for more information.
Your paranoia level will determine where you store your keys. You could keep them on separate encrypted devices if you wish. Also, be careful with the root token as it never expires.
Alright! Now to unseal, run vault operator unseal [key] with 3 different keys, one at a time. You can now login with the initial root token.
blake@vault-test:~$ vault login s.aIajFemqnJ3f06vzGIjMi75P
Success! You are now authenticated. The token information displayed below
is already stored in the token helper. You do NOT need to run "vault login"
again. Future Vault requests will automatically use this token.

Key                  Value
---                  -----
token                s.aIajFemqnJ3f06vzGIjMi75P
token_accessor       oz6lMguYyxuBmfdcDFOxEo3n
token_duration       ∞
token_renewable      false
token_policies       ["root"]
identity_policies    []
policies             ["root"]
So we're going to want to create a store for our passwords and then create a limited user with access to it.
blake@vault-test:~$ vault secrets enable -path=passwords kv-v2
Success! Enabled the kv-v2 secrets engine at: passwords/
To create a policy with access to this resource, create and edit a file called password-policy.hcl
path "passwords/*"
{
  capabilities = ["create", "read", "update", "delete", "list"]
}
Now let's create a user with access to this keystore.
blake@vault-test:~$ vault policy write password-policy password-policy.hcl
Success! Uploaded policy: password-policy
blake@vault-test:~$ vault auth enable userpass
blake@vault-test:~$ vault write auth/userpass/users/blake password=ThisIsATestPassword policies=password-policy
Success! Data written to: auth/userpass/users/blake
Managing Secrets with the CLI
Let's login as our new user and make sure we're able to store a secret.
blake@vault-test:~$ vault login -method=userpass username=blake
Password (will be hidden):
Success! You are now authenticated.
blake@vault-test:~$ vault kv put passwords/yahoo login="someperson@yahoo.com" password="somepassword"
Key              Value
---              -----
created_time     2021-02-28T13:55:32.900321369Z
deletion_time    n/a
destroyed        false
version          1
blake@vault-test:~$ vault kv get passwords/yahoo
====== Metadata ======
Key              Value
---              -----
created_time     2021-02-28T13:55:32.900321369Z
deletion_time    n/a
destroyed        false
version          1

====== Data ======
Key         Value
---         -----
login       someperson@yahoo.com
password    somepassword
Using put again will overwrite all key entries. Use patch to add a value without deleting.
blake@vault-test:~$ vault kv patch passwords/yahoo "mother's maiden name"=99l4Jhp7
Key              Value
---              -----
created_time     2021-02-28T15:08:20.132487093Z
deletion_time    n/a
destroyed        false
version          2
blake@vault-test:~$ vault kv get passwords/yahoo
====== Metadata ======
Key              Value
---              -----
created_time     2021-02-28T15:08:20.132487093Z
deletion_time    n/a
destroyed        false
version          2

============ Data ============
Key                     Value
---                     -----
login                   someperson@yahoo.com
mother's maiden name    99l4Jhp7
password                somepassword
Alright, so we're able to store and view passwords using the command line. This is practical if you have an ssh jump into your home network. The web interface is definitely much easier to work with though if you're running a VPN instead. So let's get that setup.
Configuring a Reverse Proxy
For the sake of this tutorial, I'm going to recommend Nginx as a reverse proxy. Much like with the database, your home server is probably already running this or Apache. I'll be using a LetsEncrypt certificate for good measure, but if your webserver isn't remote accessible at all, you might wind up using a self-signed cert instead.
# apt install nginx certbot python3-certbot-nginx
# certbot certonly --nginx -d vault.yourdomain.ext
Add an entry for Vault in /etc/nginx/sites-available/vault.conf
server {
  listen         80;
  server_name    vault.yourdomain.ext;
  return         301 https://vault.yourdomain.ext$request_uri;
  access_log     /var/log/nginx/vault.access.log;
  error_log      /var/log/nginx/vault.error.log;
}


server  {
  listen                443 ssl;
  server_name           vault.yourdomain.ext;

  access_log     /var/log/nginx/vault.access.log;
  error_log      /var/log/nginx/vault.error.log;

  ssl_session_cache shared:SSL:1m;
  ssl_session_timeout  10m;
  ssl_ciphers HIGH:!aNULL:!MD5;
  ssl_prefer_server_ciphers on;
  ssl_certificate /etc/letsencrypt/live/vault.yourdomain.ext/fullchain.pem;
  ssl_certificate_key /etc/letsencrypt/live/vault.yourdomain.ext/privkey.pem;

  location / {
    proxy_pass        http://127.0.0.1:8200/;
    proxy_buffering off;
    proxy_set_header X-Real-IP $remote_addr;
    proxy_set_header X-Forwarded-For $proxy_add_x_forwarded_for;
    proxy_set_header X-Forwarded-Proto $scheme;
    client_max_body_size 0;
    # Only allow the internal network
    allow 192.168.122.0/24;
    allow 127.0.0.1/32;
    deny all;
  }
}
With this configuration, Vault will always use https and send a 403 to requests from the public internet.
# ln -s /etc/nginx/sites-available/vault.conf /etc/nginx/sites-enabled/vault.conf
# nginx -t
# systemctl restart nginx
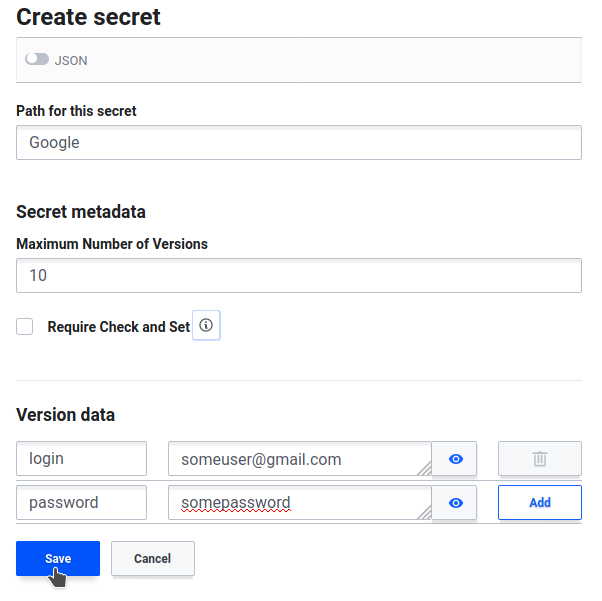
Managing Secrets with the Web UI
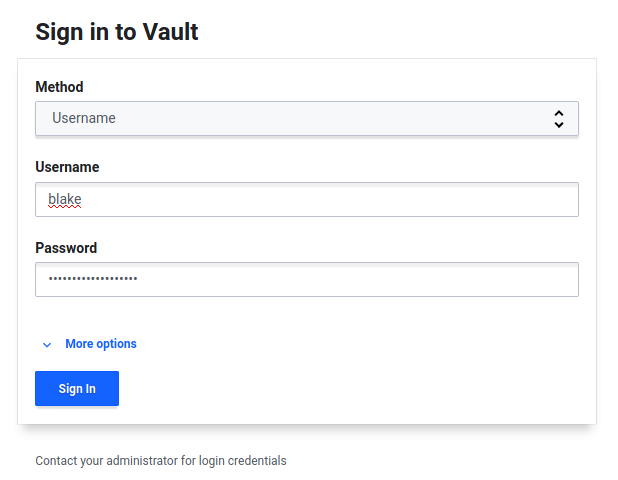
So now you should be able to login through the web portal. Change the login method to Username and we'll sign in with our limited user.
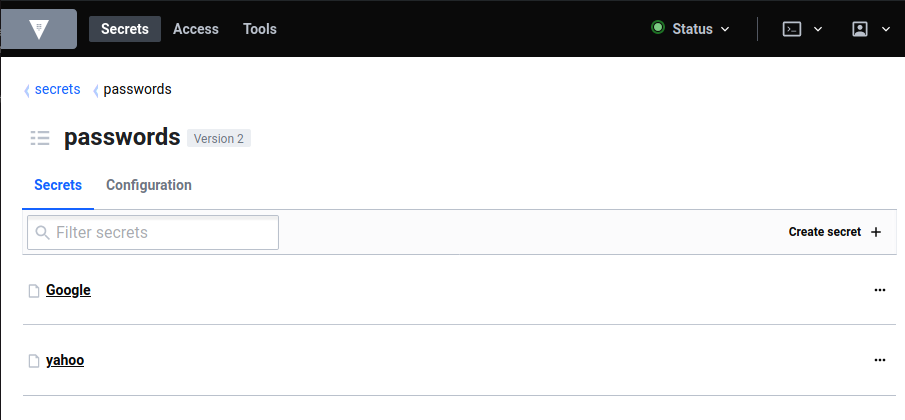
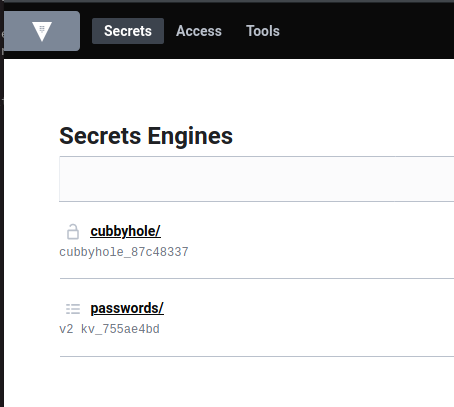
We can see the passwords keystore we created before.
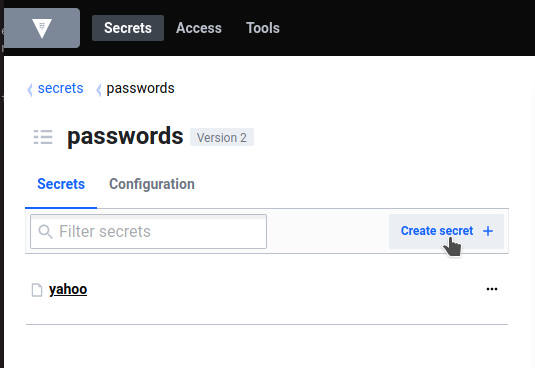
From here, we can either look at the secret we stored manually before, or create a new one. Let's add another password.
That's it! You now have a working Vault service serving an actual purpose on your home server. From here, you may as well spin up some new kv stores and users and start developing apps that use it.